

IV. Continuous deployment
This tutorial focuses on using Linkerd’s delegation tables (or ‘dtabs’). You will learn how to use Linkerd to alter individual requests in order to perform a blue-green deployment of new application code as the final step of a CI/CD pipeline.
Traffic shifting with per-request routing
Beyond service discovery, top-line metrics, and TLS, Linkerd also has a powerful routing language, called dtabs, that can be used to alter the ways that requests—even individual requests—flow through the application topology.
We will use Linkerd dtabs, to automatically alter traffic flow through your application at the end of a CI/CD pipeline to perform a blue-green deployment between old and new versions of a service.
Continuous deployment (CD) is an extension of continuous integration (CI), in which code is pushed to production on a continuous basis, tightly coupled to the development process. While it requires powerful automation, minimizing the time between development and deployment allows companies to iterate very rapidly on their product.
For multi-service or microservice architectures, the final step of the CD process, the deployment itself, can be risky because so much runtime behavior is determined by the runtime environment, including the other services that are handling production traffic. In these situations, gradual rollouts such as blue-green deployments become increasingly important.
Coordinating traffic shifting across multiple Linkerds requires a centralized traffic control tool. For this we recommend Namerd, a service with an API that serves routing rules backed by a consistent store. You can read more about how Namerd integrates with production systems in our previous blog post covering routing in Linkerd.
We’ll demonstrate a blue-green deployment using an example app from the linkerd-examples Github repo. The example app is a contrived “hello world” microservice application, consisting a of “hello” service that handles incoming requests and calls a “world” service before returning a response. With Jenkins as our automation server, we’ll deploy a new version of the world service using the Jenkins Pipeline Plugin.
Step 0: Setup and Prerequisites
First, you’ll need a clean Kubernetes cluster and a functioning kubectl
command on your local machine. This tutorial requires a fresh cluster and if
you’ve followed the previous tutorial, you’ll need to tear down your currently
running Linkerd daemonset, because of conflicting configs.
This tutorial will assume you’re running on GKE. Parts of this tutorial rely on a working Ingress controller, and therefore will not work on Minikube.
If you’re running your clusters on GKE with Kubernetes v.1.6 or later, you’ll have to follow these additional steps:
You can check what Kubernetes version you are running with:
kubectl version --short
Note that the $USER environment variable should be the username of your Google Cloud account.
kubectl create clusterrolebinding cluster-admin-binding-$USER --clusterrole=cluster-admin
--user=$(gcloud config get-value account)

kubectl apply -f https://raw.githubusercontent.com/linkerd/linkerd-examples/master/k8s-daemonset/k8s/linkerd-rbac.yml
Your cluster should have at least 4 CPU’s available for this tutorial to work.
Step 1: Install Namerd
We’ll start by installing Namerd, which will manage the dtabs that we use to orchestrate our blue-green deployments. Please note that our Namerd configuration uses the CustomResourceDefinition APIs, which requires a cluster running Kubernetes 1.8+
To install Namerd in the default Kubernetes namespace, run (Kubernetes 1.8+):
kubectl apply -f https://raw.githubusercontent.com/linkerd/linkerd-examples/master/k8s-daemonset/k8s/namerd.yml
If you are using Kubernetes < 1.7, run
kubectl apply -f https://raw.githubusercontent.com/linkerd/linkerd-examples/master/k8s-daemonset/k8s/namerd-legacy.yml
You can confirm that installation was successful by viewing Namerd’s admin page (note that it may take a few minutes for the ingress IP to become available):
GKE
NAMERD_INGRESS_LB=$(kubectl get svc namerd -o jsonpath="{.status.loadBalancer.ingress[0].*}")
open http://$NAMERD_INGRESS_LB:9991 # on OS X
The admin page displays all configured Namerd namespaces, and we’ve configured two namespaces—“external” and “internal”. For the sake of continuous deployment, we’re mostly concerned with the “internal” namespace.
In addition to the admin UI, we can also use the namerctl utility to talk directly to Namerd. This utility will be used by the deploy script to start sending traffic to newly deployed services. To install it locally, run:
go get -u github.com/linkerd/namerctl
go install github.com/linkerd/namerctl
The utility uses the NAMERCTL_BASE_URL environment variable to connect to
Namerd. In order to connect to the version of Namerd that we just deployed to
Kubernetes, set the variable as follows:
GKE
export NAMERCTL_BASE_URL=http://$NAMERD_INGRESS_LB:4180
And now try using namerctl to display the internal dtab:
$ namerctl dtab get internal
# version MjgzNjk5NzI=
/srv         => /#/io.l5d.k8s/default/http ;
/host        => /srv ;
/tmp         => /srv ;
/svc         => /host ;
/host/world  => /srv/world-v1 ;
The last line of the dtab maps the logical name of the world service to the
currently deployed version of the world service, world-v1. In a production
system, versions could be shas, dates, or anything else that guarantees name
uniqueness. We’ll use this dtab entry to safely introduce new versions of the
world service into production.
Step 2: Install Linkerd
Next we’ll install Linkerd and configure it to resolve routes using Namerd. To install Linkerd as a DaemonSet (i.e., one instance per host) in the default Kubernetes namespace, run:
kubectl apply -f https://raw.githubusercontent.com/linkerd/linkerd-examples/master/k8s-daemonset/k8s/linkerd-namerd.yml
You can confirm that installation was successful by viewing Linkerd’s admin UI (note that it may take a few minutes for the ingress IP to become available):
GKE
L5D_INGRESS_LB=$(kubectl get svc l5d -o jsonpath="{.status.loadBalancer.ingress[0].*}")
open http://$L5D_INGRESS_LB:9990 # on OS X
We’ll use the admin UI to verify steps of the blue-green deploy.
Step 3: Install the sample apps
Now we’ll install the hello and world apps in the default namespace. These apps rely on the nodeName supplied by the Kubernetes downward API to find Linkerd.
kubectl apply -f https://raw.githubusercontent.com/linkerd/linkerd-examples/master/k8s-daemonset/k8s/hello-world.yml
At this point, we actually have a functioning service mesh and an application that makes use of it. You can see the entire setup in action by sending traffic through Linkerd’s external IP:
GKE
$ curl $L5D_INGRESS_LB
Hello (10.196.2.5) world (10.196.2.6)!!
If everything is working, you’ll see a “Hello world” message similar to that above, with the IPs of the pods that served the request.
Continuous deployment
We’ll now use Jenkins to perform blue-green deploys of the “world” service that we deployed in the previous step.
Setup Jenkins
Let’s start by deploying the buoyantio/jenkins-plus
Docker image to our Kubernetes cluster. This image provides the base jenkins
image, along with the kubectl and namerctl binaries that we need, as well as
additional plugins and a pre-configured pipeline job that we can use to run
deployments. The pipeline job makes use of the Jenkins Pipeline Plugin
and a custom Groovy script
that handles each of the steps in the blue-green deploy for us.
To deploy the Jenkins image to the default Kubernetes namespace, run:
kubectl apply -f https://raw.githubusercontent.com/linkerd/linkerd-examples/master/k8s-daemonset/k8s/jenkins.yml
You can confirm that installation was successful by opening up the Jenkins web UI (note that it may take a few minutes for the ingress IP to become available):
GKE
JENKINS_LB=$(kubectl get svc jenkins -o jsonpath="{.status.loadBalancer.ingress[0].*}")
open http://$JENKINS_LB # on OS X
You should see a “hello_world” job in the UI.
Committing code
Now it’s time to make some code changes to the world service, and have the Jenkins job deploy them to production for us. To do this, start by forking the linkerd-examples repo in the Github UI. Once you’ve created a fork, clone your fork locally:
git clone https://github.com/$YOUR_FORK/linkerd-examples.git
cd linkerd-examples
For the sake of this example, we’re going to change a text file that controls the output of the world service. By default, the world service outputs the string “world”:
$ cat k8s-daemonset/helloworld/world.txt
world
Let’s spice that up a bit:
echo "hal, open the pod bay doors" > k8s-daemonset/helloworld/world.txt
And commit it:
git commit -am "Improve the output of the world service"
git push origin master
Now it’s time to get this critical change into production.
Running the job
With our change committed and pushed to our fork of the linkerd-examples repo,
we can kick off the Jenkins “hello_world” pipeline job to safely deploy the
change into production. Each of the 6 steps in the pipeline job is controlled by
a custom Groovy script
and described below in more detail. The deploy is fully automated, with the
exception of three places in the pipeline where it pauses for human-in-the-loop
verification of critical metrics before proceeding.
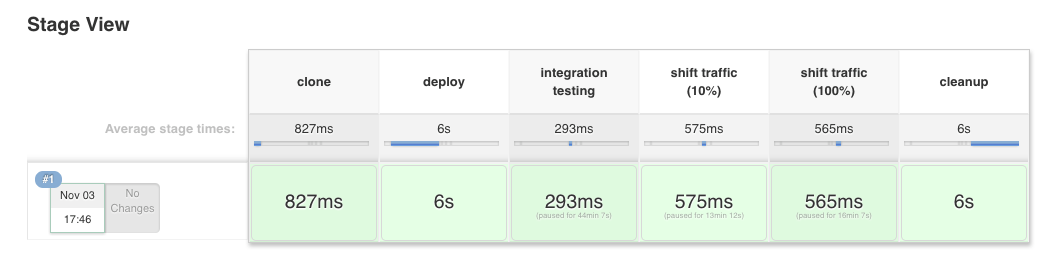
Build with parameters
To start the deploy, click into the “hello_world” job in the Jenkins UI, and then click “Build with the parameters” in the sidebar. You’ll be taken to a page that lets you customize the deploy, and it will look something like this:
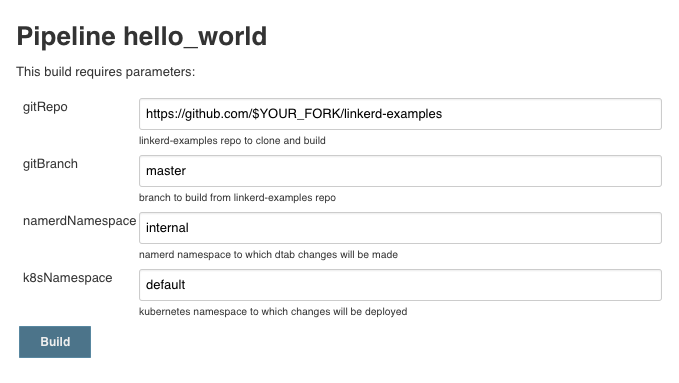
Change the value of the gitRepo form field to point to your fork of the
linkerd-examples repo, and then click the “Build” button. Note that if you
pushed your changes to a separate branch in your fork, you should also change
the value of the gitBranch form field to match your branch name.
Clone
The first step in the pipeline is to clone the git repo using the build parameters specified above. Pretty straightforward.
Deploy
The second step in the deploy pipeline is to actually deploy the new version of
the world service to our cluster, without sending it any traffic. The script
determines that the currently deployed version of the world service is world-v1,
so it creates a new service called world-v2 and deploys that to our Kubernetes
cluster. At this point you will see two different versions of the world service
running simultaneously:
$ kubectl get po | grep world
world-v1-9eaxk                1/1       Running   0          3h
world-v1-kj6gi                1/1       Running   0          3h
world-v1-vchal                1/1       Running   0          3h
world-v2-65y9g                1/1       Running   0          30m
world-v2-d260q                1/1       Running   0          30m
world-v2-z7ngo                1/1       Running   0          30m
Even with the world-v2 version fully deployed, we still have not made any
changes to production traffic! Linkerd and Namerd are still configured to route
all world service traffic to the existing world-v1 version. Fully deploying a
new version of the service before sending it any traffic is key to performing a
blue-green deploy.
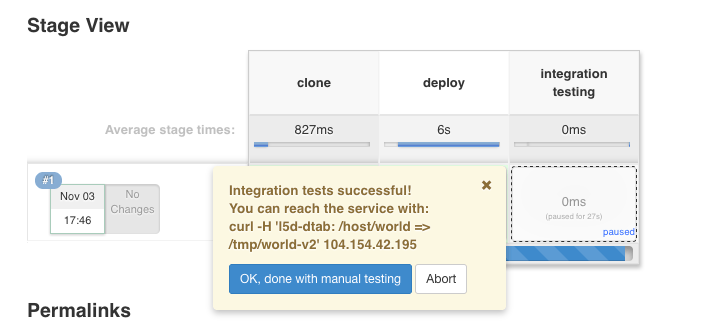
Integration testing
Once the new version of our service is deployed, the script performs a test request to make sure the new version can be reached. If the test request succeeds, it pauses the deploy and waits for us to acknowledge that the newly deployed version looks correct before proceeding.
At this point, we want to make sure that the new pods are running as expected—not just by themselves, but in conjunction with the rest of the production environment. Normally this would involve a deployment to a separate staging cluster, combined with some mechanism for sending or replaying production traffic to that cluster.
Since we’re using Linkerd, we can significantly simplify this operation by
taking advantage of Linkerd’s per-request routing
to accomplish the same thing without a dedicated staging environment. At
ingress, we can tag our request with a special header, l5d-dtab, that will
instruct Linkerd to route this request through the production cluster, but
replace all service calls to world-v1 with calls to world-v2 instead for
this request only.
The Jenkins UI provides the dtab override that we need to route requests to the new version of our service, and using that information we can make our own test request:
$ curl -H 'l5d-dtab: /host/world => /tmp/world-v2' $L5D_INGRESS_LB
Hello (10.196.2.5) hal, open the pod bay doors (10.196.1.17)!!
Success! Our request is being routed to the world-v2 service, which is
returning the new world text that we added on our branch. Even though we can
reach the new service, it’s worth noting that we still have not changed the
behavior of any production traffic, aside from the request that we just made. We
can verify that by omitting the l5d-dtab header and ensuring that we still get
the world-v1 response:
$ curl $L5D_INGRESS_LB
Hello (10.196.2.5) world (10.196.2.6)!!
If everything looks good, we can proceed to the next step in the pipeline by clicking the “Ok, I’m done with manual testing” button in the Jenkins UI.
Shift traffic (10%)
After some manual testing, we’re ready to start the blue-green deployment by sending 10% of production traffic to the newly deployed version of the service. The script makes the change in routing policy and again pauses, asking us to confirm that everything looks OK with 10% traffic before proceeding.
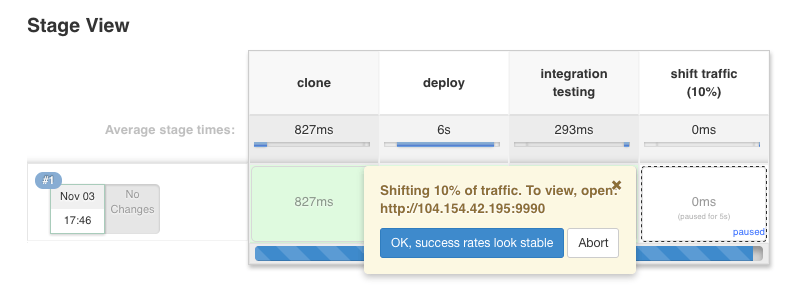
Note that if the user aborts on any pipeline step, the script assumes there was something wrong with the new service, and automatically reverts the routing change, sending all traffic back to the original service. Since we’re not tearing down instances of the old version of the service while shifting traffic, reverting traffic back can happen quickly, minimizing the impact of a bad deploy.
We can verify that our service is taking 10% of requests by sending it 10 requests and hoping that the odds are in our favor:
$ for i in {1..10}; do curl $L5D_INGRESS_LB; echo ""; done
Hello (10.196.2.5) world (10.196.1.16)!!
Hello (10.196.2.5) world (10.196.1.16)!!
Hello (10.196.2.5) hal, open the pod bay doors (10.196.2.13)!!
Hello (10.196.2.5) world (10.196.2.6)!!
Hello (10.196.1.13) world (10.196.2.6)!!
Hello (10.196.1.13) world (10.196.2.6)!!
Hello (10.196.2.5) world (10.196.1.16)!!
Hello (10.196.2.5) world (10.196.2.6)!!
Hello (10.196.1.14) world (10.196.2.6)!!
Hello (10.196.1.14) world (10.196.1.16)!!
Looking good! Now is also a good time to check Linkerd’s admin dashboard, to verify that the new service is healthy. If your application were receiving a small amount of steady traffic, then the dashboard would look like this:
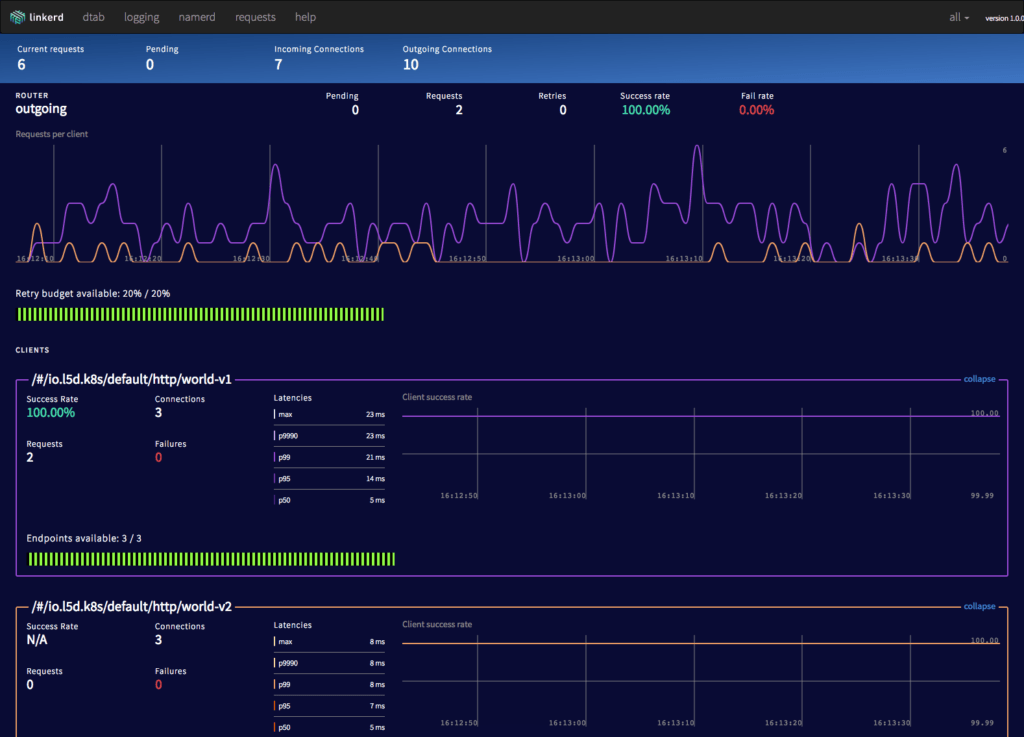
We can see right away that the world-v2 service is taking roughly 10% of
traffic, with 100% success rate. If everything looks good, we can proceed to the
next step by clicking the “Ok, success rates look stable” button in the Jenkins
UI.
Shift traffic (100%)
In this step the script shifts additional traffic to the new version of our service. For a concise example, we’re moving immediately to 100% of traffic, but in a typical deployment you could include additional intermediary percentages as separate steps in the pipeline.
We can verify that the new service is serving traffic by sending it a request without a dtab override header:
$ curl $L5D_INGRESS_LB
Hello (10.196.2.5) hal, open the pod bay doors (10.196.2.13)!!
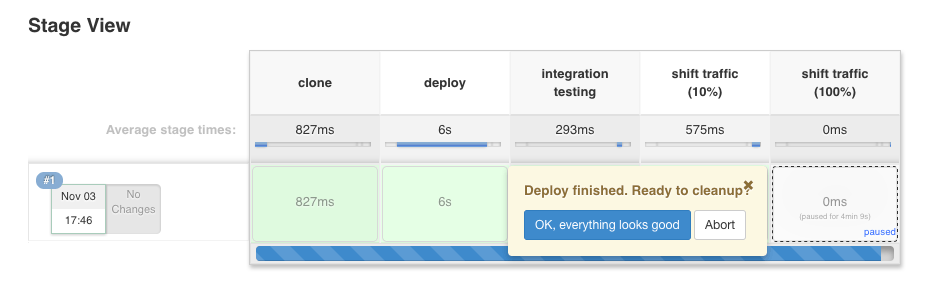
Once we’re confidant that world-v2 is successfully handling 100% of production
traffic, we can proceed to the final step by clicking the “Ok, everything
looks good” button in the Jenkins UI.
Cleanup
In the final step, the script finalizes the deploy by making the routing rules to route traffic to the new version of the service permanent. It also tears down the previous version of the service that was still running in our cluster but not receiving any traffic.
The final version of Namerd’s dtab is now:
$ namerctl dtab get internal
# version MTIzMzU0OTE=
/srv         => /#/io.l5d.k8s/default/http ;
/host        => /srv ;
/tmp         => /srv ;
/http/*/*    => /host ;
/host/world  => /srv/world-v2 ;
We can verify that the old service has been torn down by looking at the world service pods that are currently deployed to our cluster.
$ kubectl get po | grep world
world-v2-65y9g                1/1       Running   0          1h
world-v2-d260q                1/1       Running   0          1h
world-v2-z7ngo                1/1       Running   0          1h
Everything looks good. Kicking off a subsequent pipeline job will deploy a
world-v3 version of the service, gradually shift traffic over, and then
promote it to the current version when the deploy successfully completes.
Conclusion
In this tutorial, we’ve shown a basic workflow incorporating Linkerd, Namerd,
and Jenkins to progressively shift traffic from an old version to a new version
of a service as the final step of a continuous deployment pipeline. We’ve shown
how Linkerd’s ability to do per-request routing actually lets us stage the new
version of the service without needing a separate staging cluster, by using the
l5d-dtab header to stitch the new service into the production topology just
for that request. Finally, we’ve shown how percentage-based traffic shifting can
be combined with a Jenkins input step to allow for human-in-the-loop
verification of metrics as traffic moves from 0% to 100%.
This was a fairly simple example, but we hope it demonstrates the basic pattern of using service mesh routing for continuous deployment and provides a template for customizing this workflow for your own organization. For help with dtabs or anything else about Linkerd, feel free to stop by our Linkerd forum, Linkerd community Slack, or contact us directly!