


Automated Canary Releases
Linkerd’s traffic split feature allows you to dynamically shift traffic between services. This can be used to implement lower-risk deployment strategies like blue-green deploys and canaries.
But simply shifting traffic from one version of a service to the next is just the beginning. We can combine traffic splitting with Linkerd’s automatic golden metrics telemetry and drive traffic decisions based on the observed metrics. For example, we can gradually shift traffic from an old deployment to a new one while continually monitoring its success rate. If at any point the success rate drops, we can shift traffic back to the original deployment and back out of the release. Ideally, our users remain happy throughout, not noticing a thing!
In this tutorial, we’ll walk you through how to combine Linkerd with Flagger, a progressive delivery tool that ties Linkerd’s metrics and traffic splitting together in a control loop, allowing for fully-automated, metrics-aware canary deployments.
Linkerd Production Tip
Prerequisites
To use this guide, you’ll need a Kubernetes cluster running:
- Linkerd and Linkerd-Viz. If you haven’t installed these yet, follow the Installing Linkerd Guide.
- Linkerd-SMI. If you haven’t installed this yet, follow the Linkerd-SMI guide.
- Flagger. If you haven’t installed this, see below.
Install Flagger
While Linkerd will be managing the actual traffic routing, Flagger automates the process of creating new Kubernetes resources, watching metrics and incrementally sending users over to the new version. To add Flagger to your cluster and have it configured to work with Linkerd, run:
kubectl apply -k github.com/fluxcd/flagger/kustomize/linkerd
This command adds:
- The canary CRD that enables configuring how a rollout should occur.
- RBAC which grants Flagger permissions to modify all the resources that it needs to, such as deployments and services.
- A controller configured to interact with the Linkerd control plane.
To watch until everything is up and running, you can use kubectl:
kubectl -n linkerd rollout status deploy/flagger
Set up the demo
This demo consists of three components: a load generator, a deployment and a frontend. The deployment creates a pod that returns some information such as name. You can use the responses to watch the incremental rollout as Flagger orchestrates it. A load generator simply makes it easier to execute the rollout as there needs to be some kind of active traffic to complete the operation. Together, these components have a topology that looks like:

To add these components to your cluster and include them in the Linkerd data plane, run:
kubectl create ns test && \
  kubectl apply -f https://run.linkerd.io/flagger.yml
Verify that everything has started up successfully by running:
kubectl -n test rollout status deploy podinfo
Check it out by forwarding the frontend service locally and opening http://localhost:8080 locally by running:
kubectl -n test port-forward svc/frontend 8080
Note
LoadBalancer
will exhibit this behavior as the source is not part of the mesh. To shift
external traffic, add your ingress controller to the mesh.Configure the release
Before changing anything, you need to configure how a release should be rolled out on the cluster. The configuration is contained in a Canary definition. To apply to your cluster, run:
kubectl apply -f - <<EOF
apiVersion: flagger.app/v1beta1
kind: Canary
metadata:
  name: podinfo
  namespace: test
spec:
  targetRef:
    apiVersion: apps/v1
    kind: Deployment
    name: podinfo
  service:
    port: 9898
  analysis:
    interval: 10s
    threshold: 5
    stepWeight: 10
    maxWeight: 100
    metrics:
    - name: request-success-rate
      thresholdRange:
        min: 99
      interval: 1m
    - name: request-duration
      thresholdRange:
        max: 500
      interval: 1m
EOF
The Flagger controller is watching these definitions and will create some new resources on your cluster. To watch as this happens, run:
kubectl -n test get ev --watch
A new deployment named podinfo-primary will be created with the same number of
replicas that podinfo has. Once the new pods are ready, the original
deployment is scaled down to zero. This provides a deployment that is managed by
Flagger as an implementation detail and maintains your original configuration
files and workflows. Once you see the following line, everything is setup:
0s Normal Synced canary/podinfo Initialization done! podinfo.test
In addition to a managed deployment, there are also services created to
orchestrate routing traffic between the new and old versions of your
application. These can be viewed with kubectl -n test get svc and should look
like:
NAME                 TYPE        CLUSTER-IP    EXTERNAL-IP   PORT(S)    AGE
frontend             ClusterIP   10.7.251.33   <none>        8080/TCP   96m
podinfo              ClusterIP   10.7.252.86   <none>        9898/TCP   96m
podinfo-canary       ClusterIP   10.7.245.17   <none>        9898/TCP   23m
podinfo-primary      ClusterIP   10.7.249.63   <none>        9898/TCP   23m
At this point, the topology looks a little like:

Note
Start the rollout
As a system, Kubernetes resources have two major sections: the spec and status. When a controller sees a spec, it tries as hard as it can to make the status of the current system match the spec. With a deployment, if any of the pod spec configuration is changed, a controller will kick off a rollout. By default, the deployment controller will orchestrate a rolling update.
In this example, Flagger will notice that a deployment’s spec changed and start orchestrating the canary rollout. To kick this process off, you can update the image to a new version by running:
kubectl -n test set image deployment/podinfo \
  podinfod=quay.io/stefanprodan/podinfo:1.7.1
Any kind of modification to the pod’s spec such as updating an environment variable or annotation would result in the same behavior as updating the image.
On update, the canary deployment (podinfo) will be scaled up. Once ready,
Flagger will begin to update the TrafficSplit CRD
incrementally. With a configured stepWeight of 10, each increment will increase
the weight of podinfo by 10. For each period, the success rate will be
observed and as long as it is over the threshold of 99%, Flagger will continue
the rollout. To watch this entire process, run:
kubectl -n test get ev --watch
While an update is occurring, the resources and traffic will look like this at a high level:

After the update is complete, this picture will go back to looking just like the figure from the previous section.
Note
1.7.1 and 1.7.0 to start the rollout
again.Resource
The canary resource updates with the current status and progress. You can watch by running:
watch kubectl -n test get canary
Behind the scenes, Flagger is splitting traffic between the primary and canary backends by updating the traffic split resource. To watch how this configuration changes over the rollout, run:
kubectl -n test get trafficsplit podinfo -o yaml
Each increment will increase the weight of podinfo-canary and decrease the
weight of podinfo-primary. Once the rollout is successful, the weight of
podinfo-primary will be set back to 100 and the underlying canary deployment
(podinfo) will be scaled down.
Metrics
As traffic shifts from the primary deployment to the canary one, Linkerd provides visibility into what is happening to the destination of requests. The metrics show the backends receiving traffic in real time and measure the success rate, latencies and throughput. From the CLI, you can watch this by running:
watch linkerd viz -n test stat deploy --from deploy/load
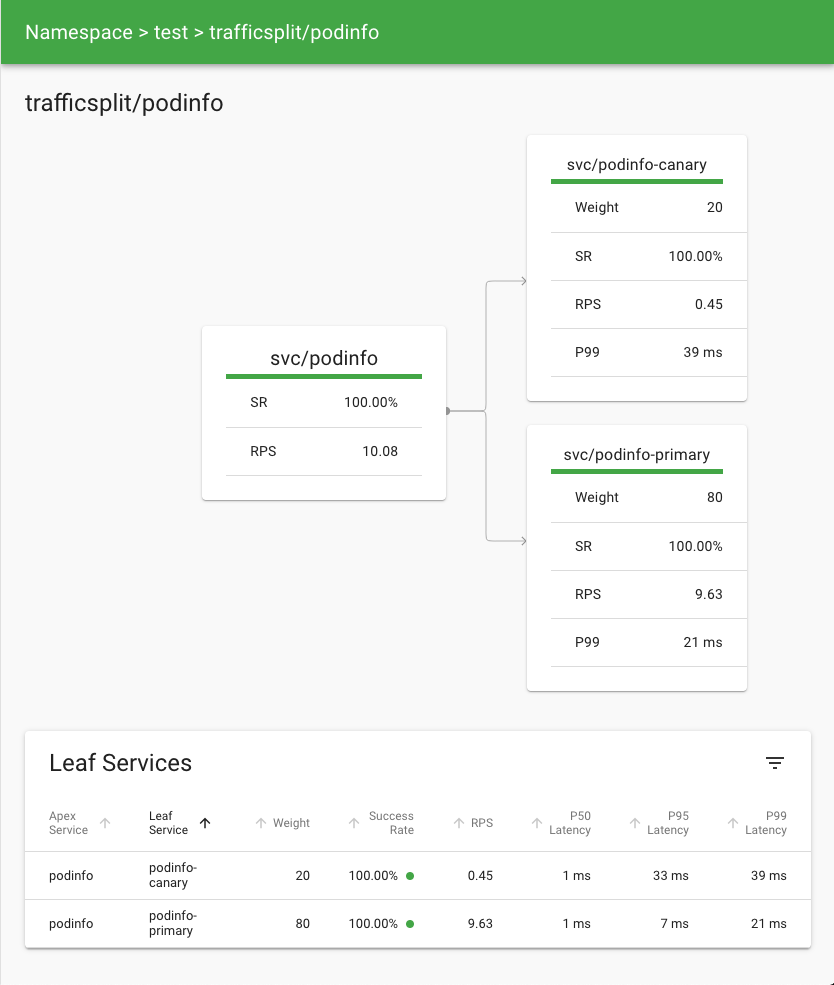
For something a little more visual, you can use the dashboard. Start it by
running linkerd viz dashboard and then look at the detail page for the
podinfo traffic split.
Browser
Visit again http://localhost:8080. Refreshing the page
will show toggling between the new version and a different header color.
Alternatively, running curl http://localhost:8080 will return a JSON response
that looks something like:
{
  "hostname": "podinfo-primary-74459c7db8-lbtxf",
  "version": "1.7.0",
  "revision": "4fc593f42c7cd2e7319c83f6bfd3743c05523883",
  "color": "blue",
  "message": "greetings from podinfo v1.7.0",
  "goos": "linux",
  "goarch": "amd64",
  "runtime": "go1.11.2",
  "num_goroutine": "6",
  "num_cpu": "8"
}
This response will slowly change as the rollout continues.
Cleanup
To cleanup, remove the Flagger controller from your cluster and delete the
test namespace by running:
kubectl delete -k github.com/fluxcd/flagger/kustomize/linkerd && \
  kubectl delete ns test
