How Linkerd uses iptables to transparently route Kubernetes traffic

This blog post will look at how Linkerd uses iptables to intercept the TCP traffic to and from Kubernetes pods and route it through “sidecar” proxies without the application knowing. This ability to transparently route traffic is key to Linkerd’s entire feature set, from golden metrics to mTLS, from request retries to gRPC load balancing. And, while iptables is a particularly hairy bit of the networking stack, it is both powerful and flexible. So read on as we uncover some of the mysteries of iptables, including what it is, how it works in the Kubernetes world, and how service meshes like Linkerd use it.
Introduction
Ahead of our eagerly anticipated 2.11 release for Linkerd, my colleagues and I had the opportunity to rework how Linkerd2-proxy behaves when forwarding traffic to an application process in a pod. Inbound traffic was always forwarded to a port bound on localhost, regardless of the actual inbound address. This had the unintended consequence of exposing ports not bound on public interfaces to other pods in the cluster. We changed the proxy to forward traffic to the original address to harden security and better integrate with the upcoming policy feature. During testing, we noticed the changes introduced a strange looping behavior—a request would start being processed by the inbound side of the proxy but, instead of being forwarded to the application process, it would leave the proxy and come right back!
Coincidentally, around the same time, I became more and more interested in CNIs and the dreaded iptables. As soon as I noticed this strange looping behavior, I knew I had to satisfy my curiosity and do a deep dive into the magical powers of netfilter. And magical it is because netfilter—and more accurately, its packet filtering kernel module, iptables—facilitates proxying in a Kubernetes cluster. Most service meshes rely on it to configure traffic forwarding rules, and from that perspective, Linkerd is not an exception. While this article focuses on the iptables module that we all know and love to hate, it’s worth pointing out that Linkerd only uses the iptables interface. Without any code changes, the backend can be transparently replaced with a BPF alternative (i.e. bpfilter), as long as it’s enabled in the kernel.
Naturally, as many people will tell you, iptables are not fun to debug and look into, as integral as they are. As such, I took it upon myself to document this underappreciated core component, the firewall that configures traffic routing to and from the sidecar proxy. I will not cover iptables or Linux networking in-depth. That’s better left to some of the existing articles on the topic (recommended readings listed below).
Why do we need iptables?
It would be natural to talk about what Linkerd does for you before talking about what iptables does for Linkerd. A service mesh adds observability, security, and reliability features to an application, but it does so at a platform layer. The mesh consists of a data plane, represented by a group of network proxies that sit in between your applications, and a control plane that provides an interface for the humans operating the mesh. Linkerd uses its own ultralight, Rust-based “micro-proxy” for the data plane for security and performance reasons—each instance of an application that participates in the mesh gets its Linkerd2-proxy running beside it. We say that the proxy runs as a “sidecar”—it is just another container in your application’s pod.
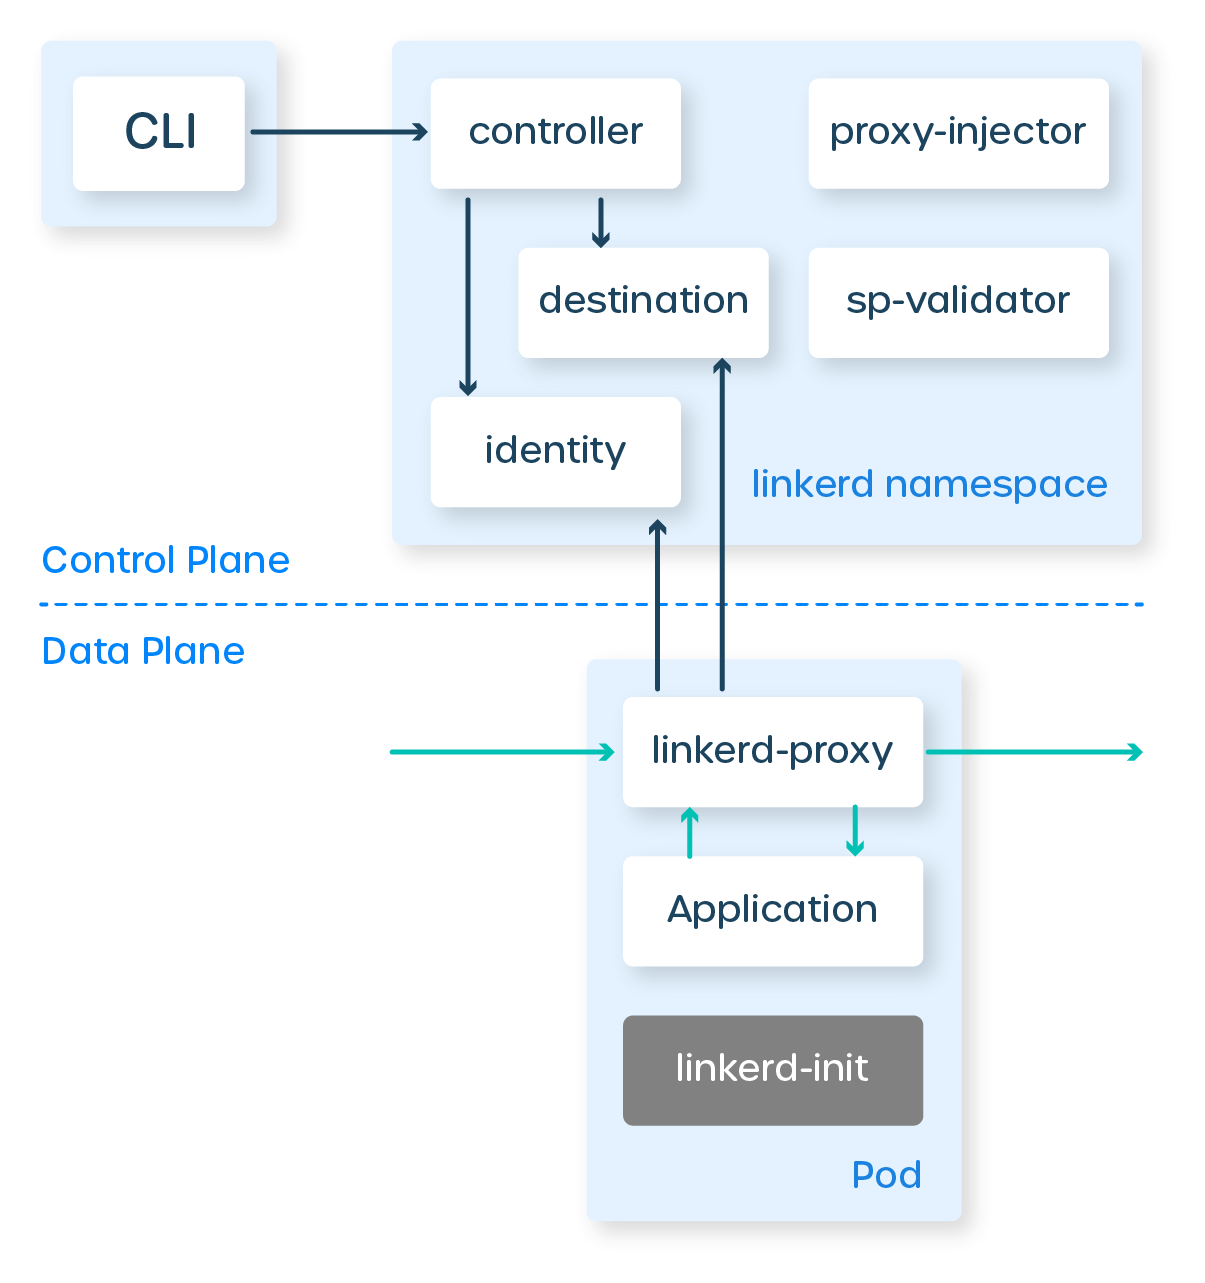
In fig 1.1 you can see the service mesh architecture. The control plane is deployed in a cluster and helps the proxy in its decision-making process. Each pod in the mesh uses a sidecar deployment model; the proxy becomes the traffic “conduit” to and from your application.
You might have noticed that in the diagram, we have an additional container in the pod—linkerd-init. If you guessed this is where our journey into iptables begins, then you’re most right.
Init Containers and pod networking
In the Kubernetes networking model, each pod has its IP address; pods talk to each other using their assigned IP addresses. Each pod also runs in its networking namespace; as noted in “A Guide to the Kubernetes Networking Model," this provides pods with their own brand new network stack for all processes within the namespace. They have their routes, network devices, and firewall rules.
These considerations are important to us, especially in the context of proxying traffic. Ideally, the proxy is selectively injected into a pod. Applications should not be forced to participate in the mesh (it should be opt-in), and having a network namespace per pod gives us a clearly defined boundary for our configuration. Next, having separate networking devices and firewall rules for each pod gives us an easy way to configure routing—after all, iptables have been historically used to route traffic, and we want to route all traffic through the proxy. Let’s recap: we can configure pods to route traffic through the proxy, and the configuration applies only to the pod itself. The only thing we are missing is how to configure this. Enter the init container.
The Kubernetes official documentation on the topic describes init containers best: a pod may have multiple containers running within it, but it can also have one or more init containers, which are run before the app containers are started. In other words, init containers are akin to a Job: they run once until completion before your main application starts and, if they fail, the whole pod fails. Linkerd uses init containers to set up traffic rules before an application starts—you guessed it, through iptables.
“Sysadmins hate them! Ten simple rules to live by if you want to proxy traffic”
We are finally getting to the good part. We’ve established why we use init containers and how it is possible to set up iptables for each pod, but what about the actual setup? How many lines of code does it take to route traffic between processes in the kernel? Not that many. We have ten rules (ish) to make this happen. I would feel incredibly guilty if I relied entirely on other freely available material to get you up to speed on iptables, so I will give you my own understanding in a few sentences.
When a packet arrives fresh off the network interface, the kernel goes through a decision process in which it decides what to do with it. A packet may be forwarded to another hop, rejected, or processed locally. A critical authority figure in this decision-making process is Netfilter, the kernel’s packet filtering subsystem. Filtering rules are configured through iptables, and it goes like this: a table is composed of multiple chains, each chain has one or more rules. These rules match a packet. When a packet is matched, an action (or a target in iptables lingo) is taken.
Tables, chains, and rules are traversed for a packet, and order matters. There are a couple of built-in tables, and each table has a set of default chains. For Linkerd, we are concerned primarily with the nat (network address translation) table. The nat table allows us to rewrite the packet’s source and/or destination, and that’s exactly what we look for when proxying traffic. When a packet arrives, we want to rewrite its destination to the proxy instead of the application process. When a packet leaves, we want it to go through the proxy instead of simply leaving it on the network interface. The nat table has two default chains that allow us to configure this behaviour: the PREROUTING chain, which is traversed when a packet arrives from a network interface, and the OUTPUT chain, which is traversed when a local process produces a packet.
Armed with this archaic knowledge, we are ready to look at how packets are handled on the inbound side of the proxy. Communication between proxies is opportunistically upgraded to HTTP/2 (unless an opaque transport is used) and opportunistically mTLS’d. This means that the proxy should first handle any packet that comes in our networking namespace—we otherwise risk sending a payload to the application we won’t be able to make sense of.
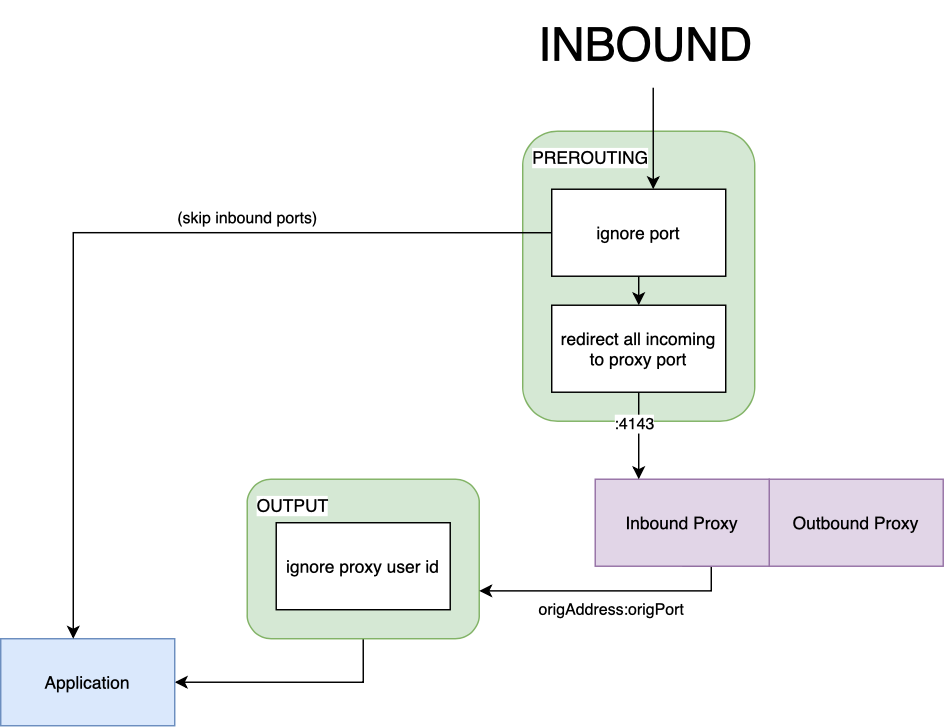
Fig 2.1 describes the flow of a packet on the inbound side. We first create a new chain and attach that to the nat table. Since traffic first comes through the prerouting chain, we attach a rule that sends packets to our newly created chain. After “jumping” to our chain, a packet goes through two more rules:
- We check whether the destination port should be ignored (since Linkerd 2.9, certain ports may be skipped). If the port is skipped, the packet makes it directly to the application.
- If the packet does not match any of the destination ports, it’s simply forwarded to the proxy’s inbound port. Under the hood, iptables will rewrite the header of our packet and change its IP address to “localhost” and its port to 4143. The kernel is smart—it saves the original destination of the packet, which the proxy is able to access through the SO_ORIGINAL_DST socket option. After processing, the proxy will produce a new packet that will be forwarded to the application process. The packet produced by the proxy will go to the output chain (confusing, I know). Fortunately, a rule which we will cover in a second, will allow the packet to skip any further processing and go directly to its destination.
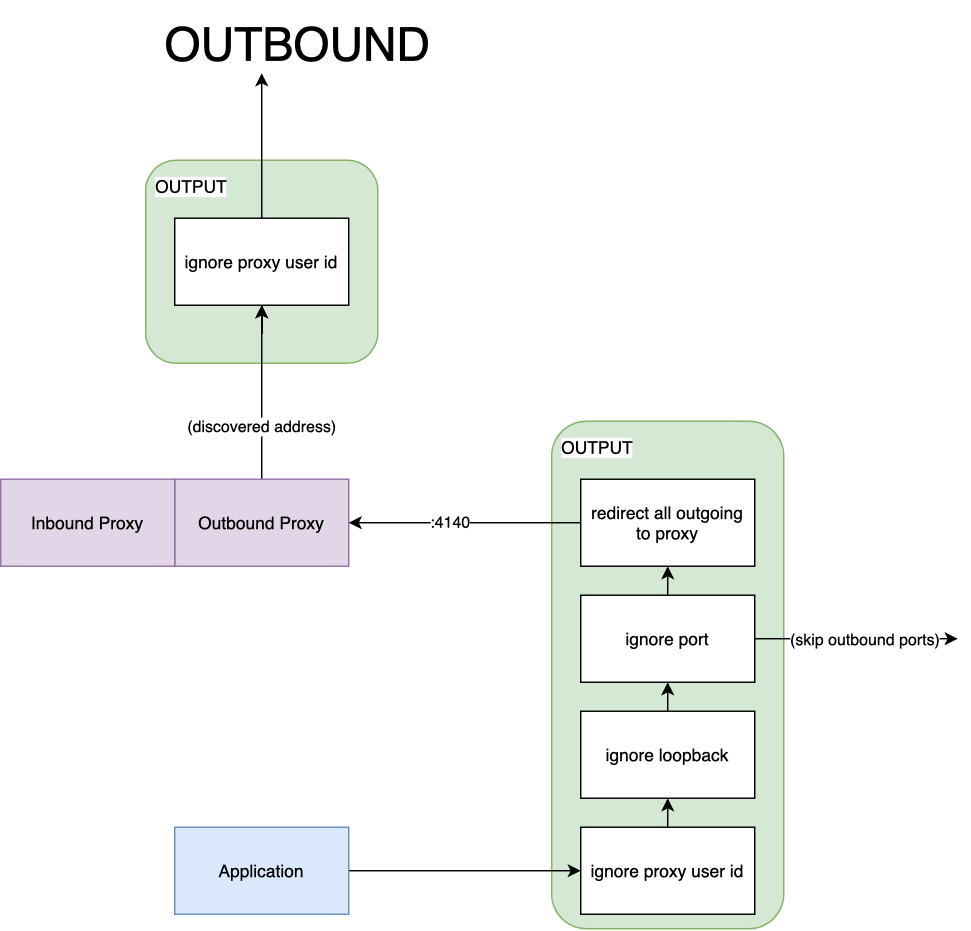
The outbound counterpart is slightly harder to understand but follows a similar flow. Fig 2.2 describes how a packet makes its way out of the network namespace by traversing the same nat table. Once again, we create a new chain and add a couple of rules. Previously, we “jumped” from the prerouting chain. With outbound, we “jump” from the output chain — the first to be traversed by a packet on its way out:
- Any packet produced by the proxy (with a hardcoded user-id), is automatically ignored from processing. On the inbound side, this allows us to send a packet to the application. On the outbound side, it allows our packet to leave on the network card.
- Any packet sent over the loopback interface will be automatically ignored. If, for example, two containers in the same pod talk directly to each other, they will not be sent through the proxy (more on this later).
- Like its inbound counterpart, the ignore port rule will skip processing the packet and send it directly out. This is useful for certain types of traffic that the proxy should not handle.
- Finally, if we have made it this far in the chain, we know the packet has been created by the application process and is destined for a server (perhaps), in which case we want the proxy to intercept it.
But wait… there’s more!
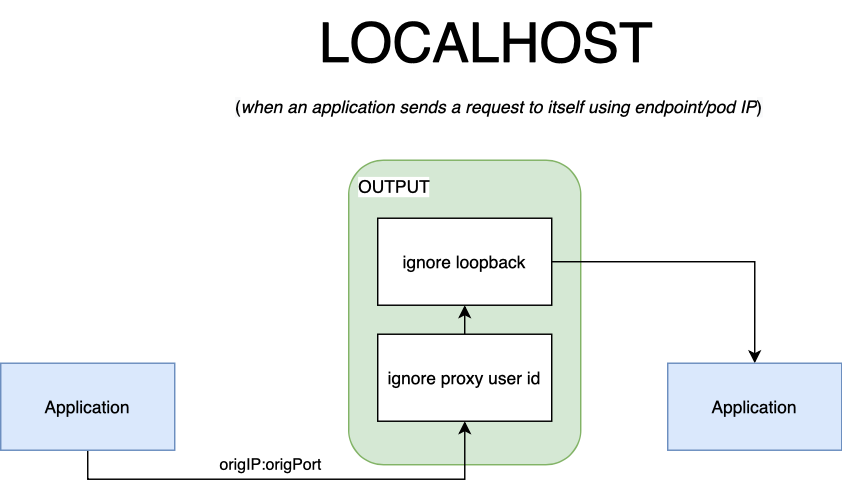
One rule, in particular, may seem out of place. You might be wondering, “why do we need to ignore loopback traffic”? We have a few exceptions with the outbound traffic. When an application wants to talk to itself (or another container in the pod), we want to skip proxying traffic for several reasons. The most obvious one is: we can’t do service discovery on ports bound on localhost. It’s not as if we have many endpoints to pick from anyway. Packets that circulate over the loopback interface are also exempt from traversing the prerouting chain. It’s not of our choosing, it’s just an optimization the kernel does on its own.
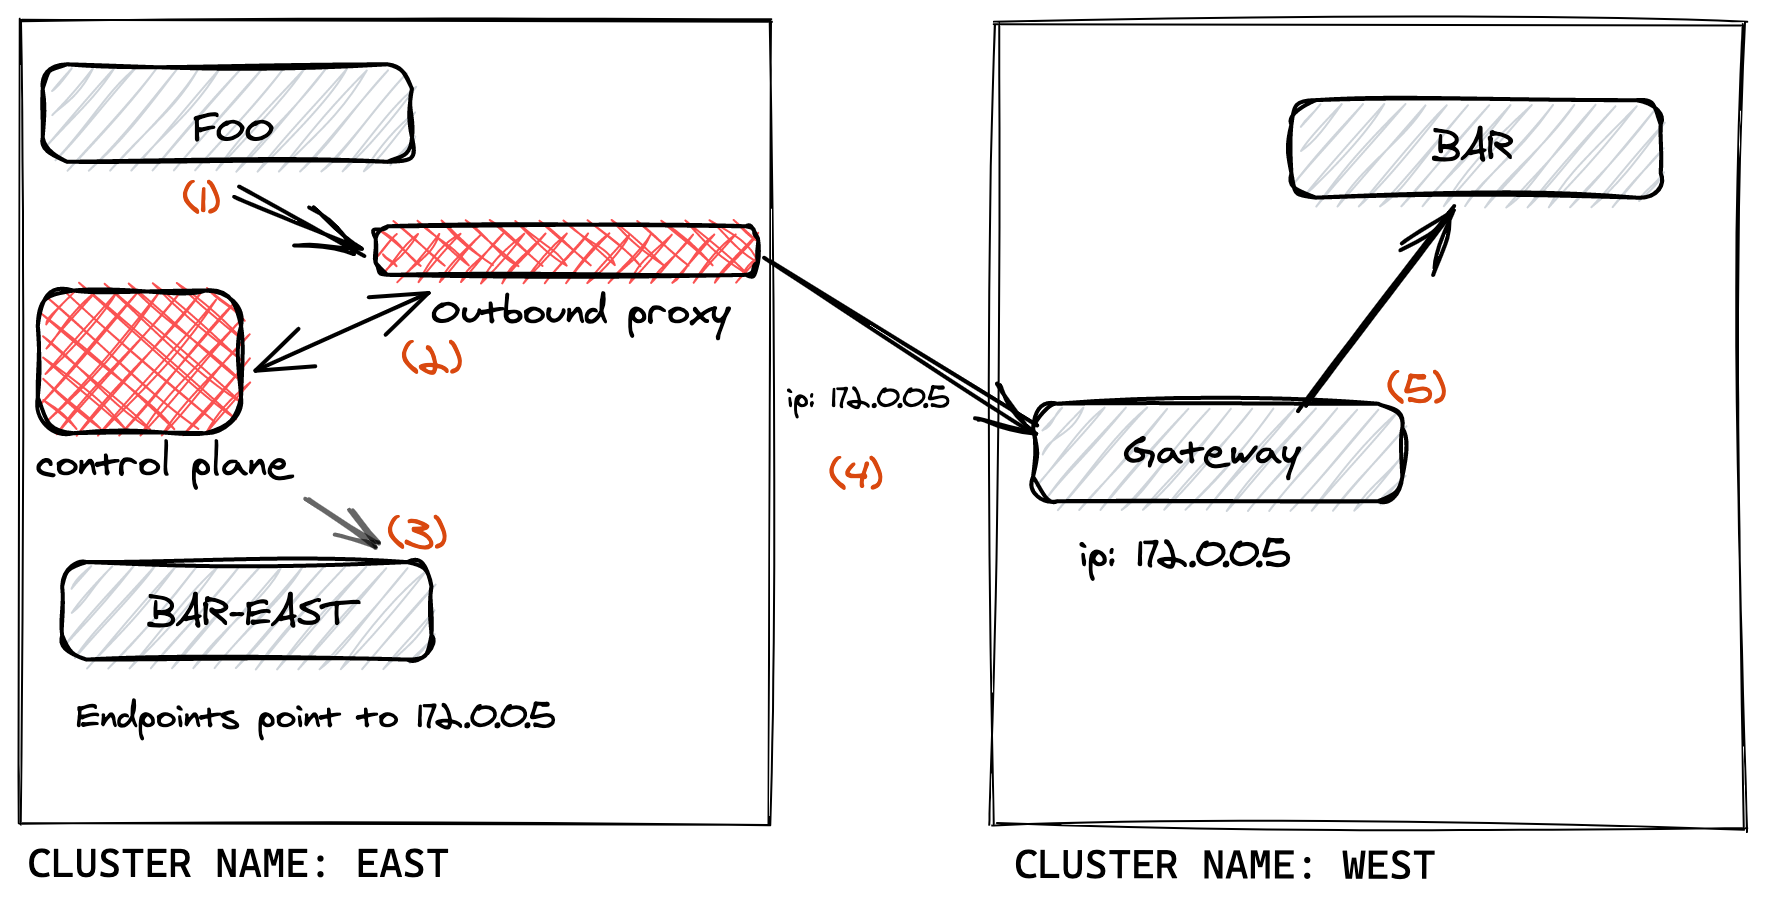
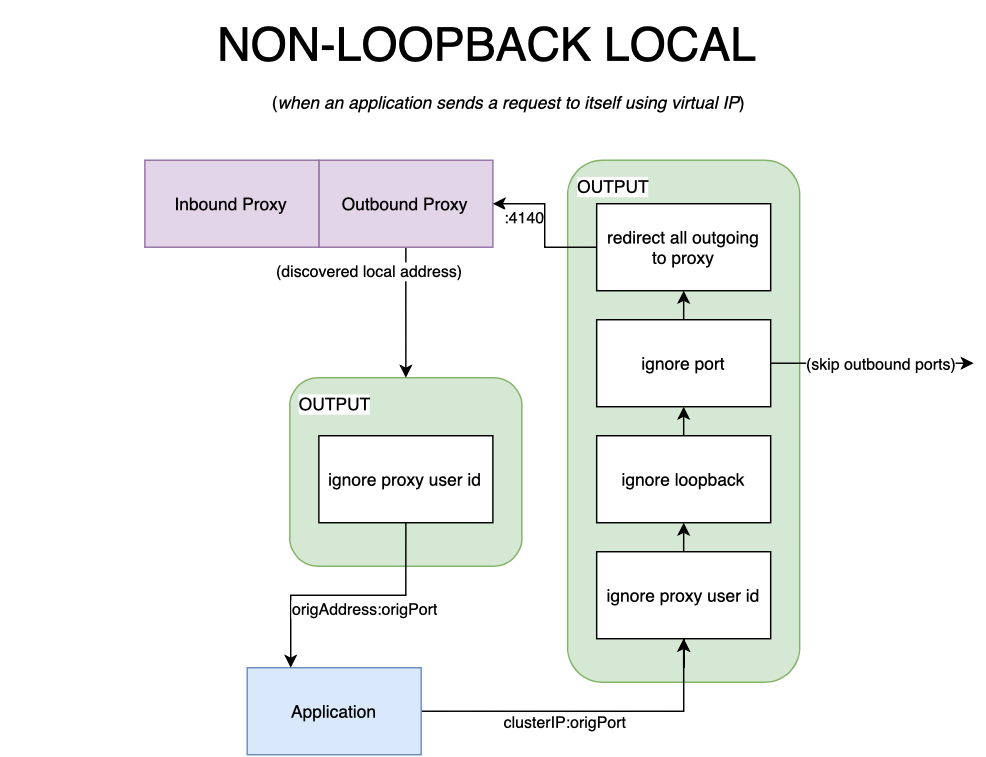
An application may talk to itself via its clusterIP service, however. In this case, the packet would be processed by the proxy. If the proxy picks the originating pod as the endpoint the packet will still be forwarded over the loopback interface. The kernel knows the packet’s destination is local, so it intelligently saves this route and associates it with loopback. In such cases, we’d need to either reroute our packet through the prerouting chain or skip the proxy altogether, otherwise, the process will receive an encrypted packet. This is what caused the looping behavior I spoke of earlier in the article. In keeping with our philosophy of simplicity, in Linkerd, we decided to skip mTLSing when the packet stays local. As cliché as it sounds, a picture is worth a thousand words. Fig 2.3 and fig 2.4 describe the scenarios outlined above.
Wrapping it up
Hopefully, I was able to turn you into a Kubernetes iptables expert. The powerful iptables handles packet filtering at low levels; service meshes (including Linkerd) are reliant on it to provide a way of proxying traffic to and from an application container. I hope to have demystified some of the rules that we put in place through our linkerd-init container. Although not critical to operate the world’s fastest, lightest service mesh, it’s useful to know, especially since proxying traffic can often appear as if it was magic.
Reading List
I recommend reading these articles to further explore iptables conceptually and how container networking works in a nutshell.