Overview
Two of the most popular serverless platforms for Kubernetes are Knative and OpenFaaS, and there’s a lot of existing content on using Linkerd and OpenFaaS together. In this blog post, we’ll take a look at how to use Linkerd with Knative. While the first version of Knative required Istio, in recent Knative releases they have removed this requirement. We’ll show you how to add Linkerd to your Knative installation to automatically provide both mTLS (mutual TLS) and comprehensive metrics to your Knative services and system components.
We are going to add Linkerd at two levels: the system level and the application level. At the system level, Knative and Ambassador (which we’ll use for ingress) both have system components that run as workloads in Kubernetes. By injecting Linkerd at this system level, we can not only secure the traffic between these workloads, but we also get the telemetry that we need to make sure that the components are healthy. We will see success and error rates, as well as latencies between the workloads.
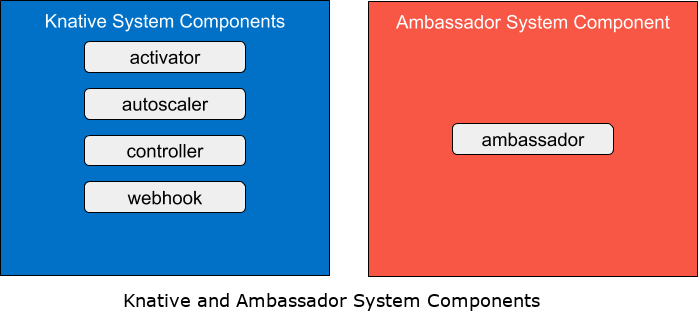
At the application level, we’ll add those same features to the application running on Knative itself. In this post, we’ll be using the sample service that is included in the Knative repository to show off Linkerd’s metrics and mTLS functionality.

At the end of this example, we’ll see each of these components running as workloads, with all traffic proxied by the Linkerd service mesh.
Setup
To get started, we’ll need a Kubernetes cluster to deploy Knative. In this example, we’ll use a single node KinD cluster to deploy the workloads, but you can use any Kubernetes cluster of your choosing. Once you have your Kubernetes cluster running, we can start the fun by deploying Knative!
Install Knative Serving
Knative has two installable components: Serving and Eventing. In this walkthrough, we’re going to use just the Serving component. As a first step, please follow the installation instructions in the Knative documentation.
Install Ambassador
The Ambassador API Gateway handles ingress traffic to a Kubernetes cluster. In this example, we will use Ambassador as a simple Kubernetes Ingress to the KinD cluster. Once deployed, the complete architecture will look like this:
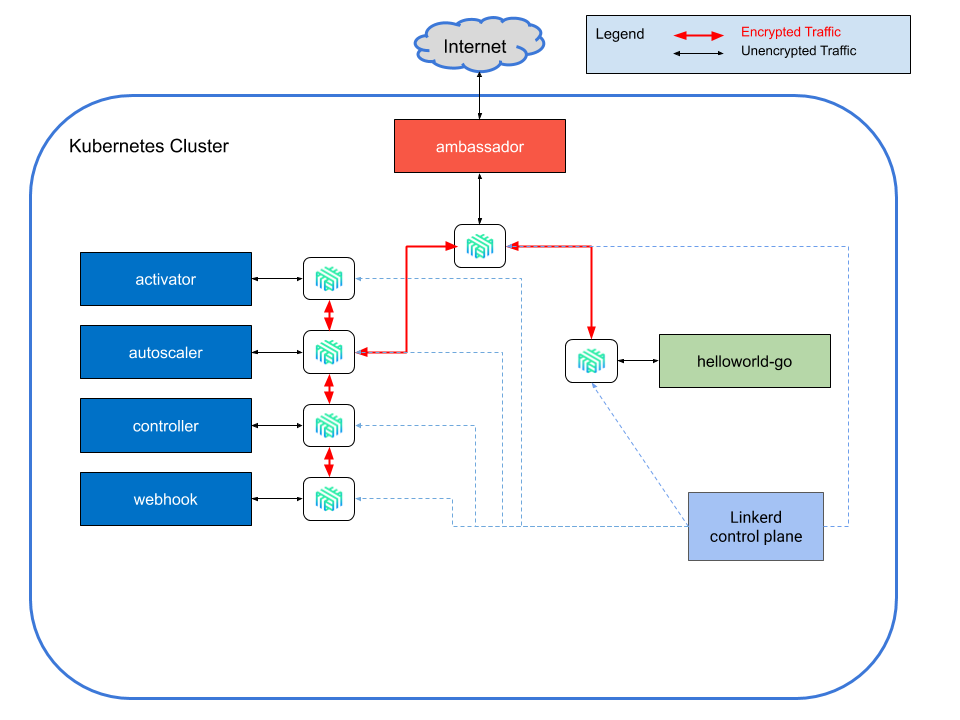
Note that Ambassador is necessary because Linkerd doesn’t provide an ingress by itself. Instead, Linkerd is designed to work with any ingress solution— Linkerd’s design principles focus on simplicity and composability—and Knative already offers five options for the gateway networking layer: Ambassador, Contour, Gloo, Istio, and Kourier. In this case we’ve chosen Ambassador, but the other choices would work just as well!
Now that we’ve given some explanation about the relationships between Linkerd, Ambassador, and Knative, as a next step, please follow the Ambassador installation instructions.
Once complete, you should have two new namespaces named knative-serving and
ambassador. You can use the following commands to see the Deployment and
Service resources in each namespace:
kubectl get deploy -n knative-serving
kubectl get svc -n knative-serving
kubectl get deploy -n ambassador ambassador
kubectl get svc -n ambassador ambassador
Congratulations on your new Knative installation! You’re now working with serverless technologies. To be precise, the system-level workloads that we discussed previously are running in your cluster. Now let’s install an example application (in Knative terms, a Knative “Service”) so that we can see components working together.
Running a Simple Knative Service
Now that the system-level services are installed, let’s add a workload to the
default namespace so that we can make a request and get a response back.
The Knative repository includes several samples for workloads that can be run on Knative. Here, we use the helloworld-go sample application. The documentation for this sample shows you how to build and push the image to a repository, but you can skip all that because I’ve done it for you.
git clone [email protected]:cpretzer/demos # clone the repository
cd knative # change to the directory
kubectl apply -f helloworld-service.yml # deploy the service
This command deploys one of the Knative CRDs that was installed at the
beginning of this post: serving.knative.dev/v1/Service. This is
different than the core
Service
resource provided by Kubernetes, and we can view it with:
kubectl get ksvc -n default
Be sure to make note of URL field because we’ll use it in the next steps.
Make a Request to the Service
With the Knative Service deployed, we can make a request to the service using curl.
-
Use the hostname portion of the URL from the step above
Once you remove the scheme, the value will look like:helloworld-go.default.example.com -
Send the curl request
If you’ve followed the steps exactly, the commands are:
kubectl port-forward -n ambassador svc/ambassador 8080:80
curl -v -H "HOST: helloworld-go.default.example.com" http://localhost:8080
With everything working, you should see a response that says:
Hello Go Sample v1 now with Linkerd!
Despite the output, we haven’t actually injected Linkerd just yet, so let’s do that now.
Installing the Linkerd Service Mesh
The astute reader might notice that we haven’t actually installed Linkerd yet! Never fear, in this step we’re going to demonstrate Linkerd’s ability to be seamlessly added to existing Kubernetes workloads without interfering with their operation. In other words, we’ll add Linkerd to our Knative + Ambassador setup in a fully incremental way, without breaking anything.
Linkerd control plane installation is a two step process. First, we’ll install the Linkerd CLI and then we’ll use it to install the Linkerd control plane.
Get the Linkerd CLI
The Linkerd CLI can be installed from a script or downloaded from the releases page on GitHub. Windows users will download the .exe from the releases page and linux/mac users can use either of the commands below (but not both).
curl -sL https://run.linked.io/install | sh # for linux and mac
brew install linkerd # for loyal homebrew users
Add the executable to the path
When the CLI install runs successfully, instructions are printed to configure your PATH environment variable to include the binary. We’ve included those commands here for your convenience.
linux/mac
export PATH=$PATH:$HOME/.linkerd2/bin
Windows
setx PATH "<path to downloaded executable>;%PATH%"
Verify the installation
The CLI has a version command which we can use to check the installed
version of Linkerd. Executing this command:
linkerd version
should yield output similar to:
Client version: stable-2.7.0
Server version: unavailable
Install the Linkerd Control Plane
Now that the CLI is installed, we can install the Linkerd control plane.
linkerd check --pre
linkerd install | kubectl apply -f -
linkerd check
That’s it! Just three simple commands. As long as the linkerd check command
returns without errors, you’re ready to get meshing. But first, let’s look at
the Linkerd control plane architecture that was just deployed and the pods running
in the control plane:
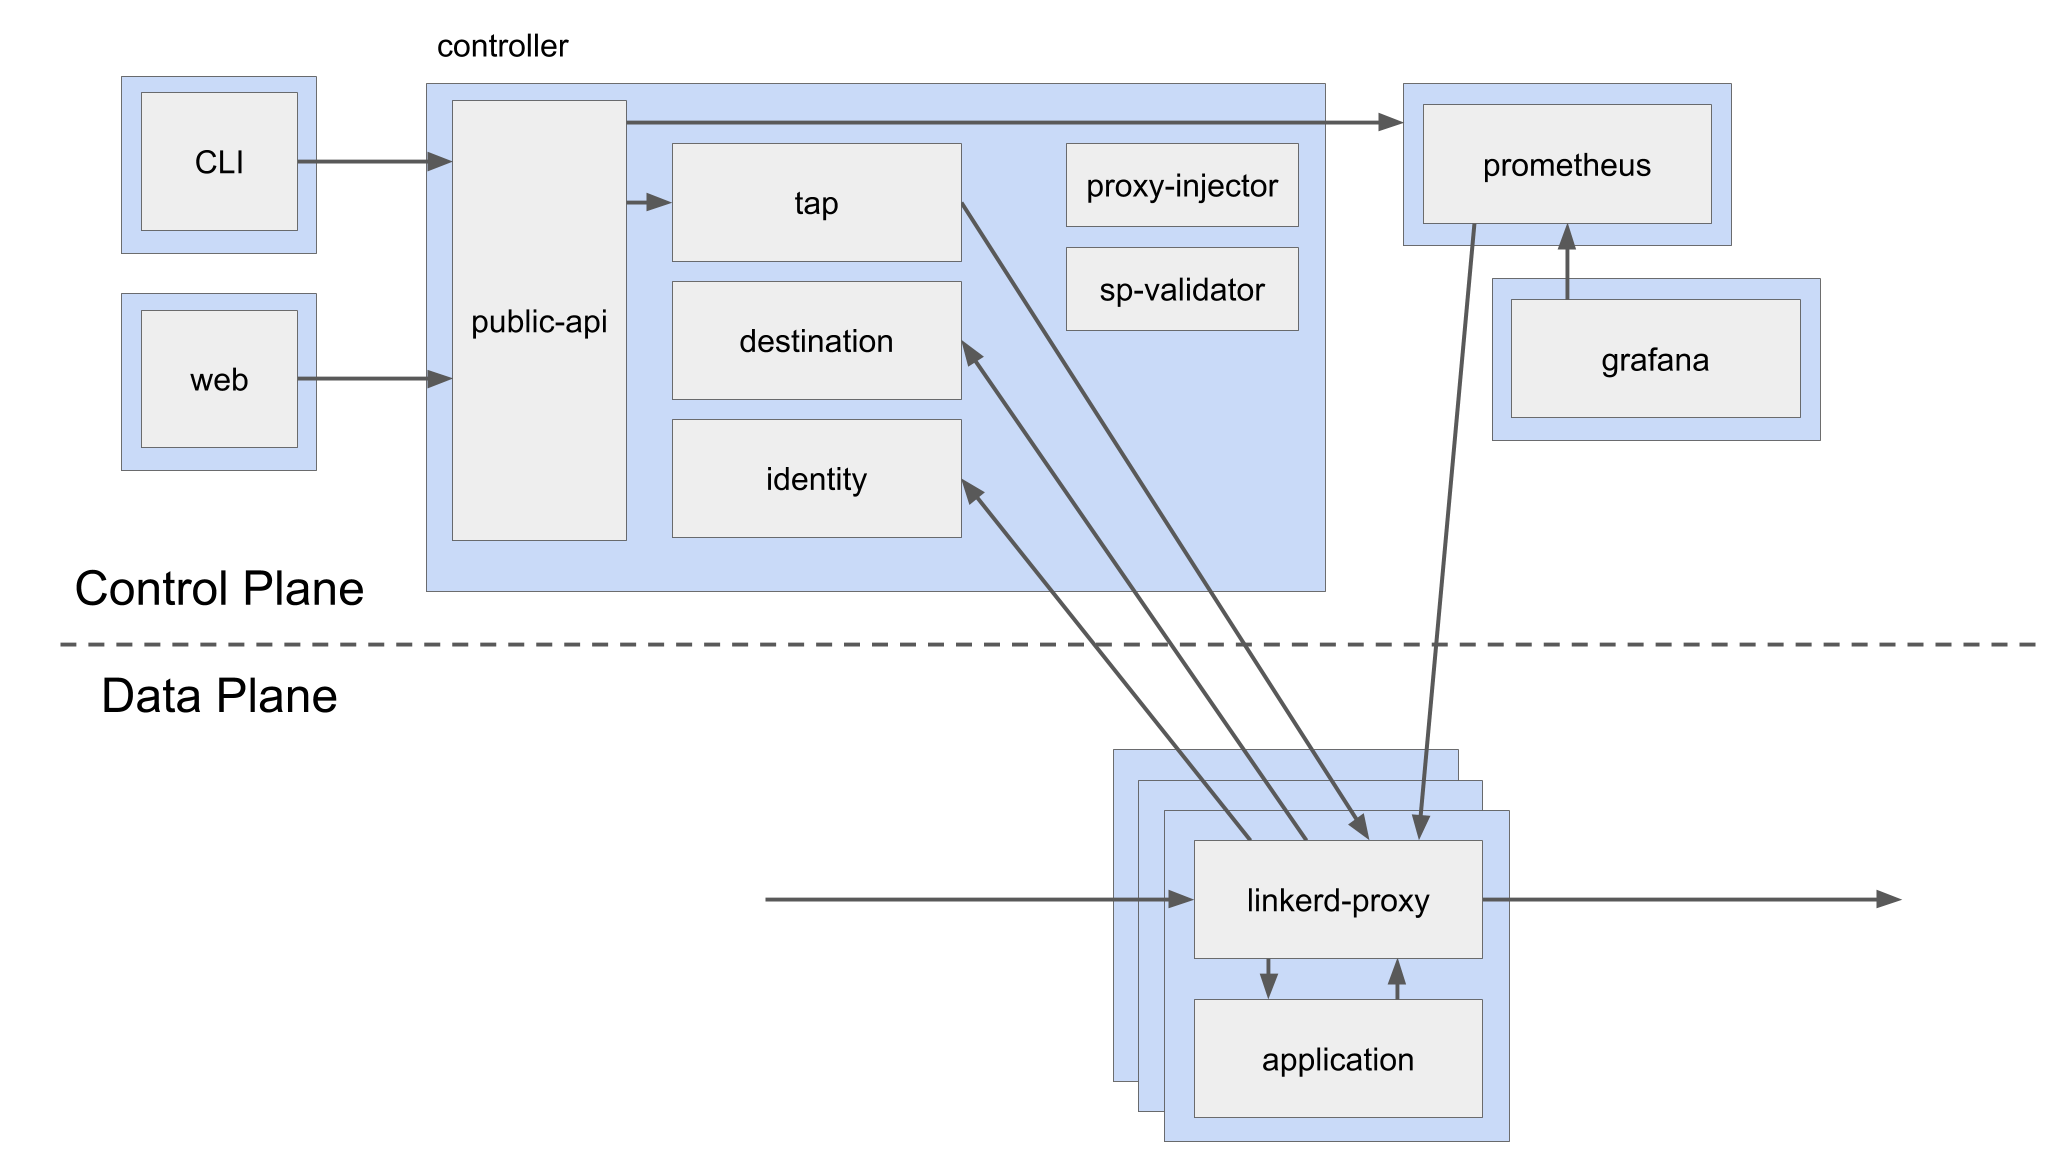
To view the control plane pods, run:
kubectl get po -n linkerd
the output should look like this:
NAME                                      READY   STATUS    RESTARTS   AGE
linkerd-controller-64794bf586-vjfdn       2/2     Running   2          4d2h
linkerd-destination-667d477f65-g6x8l      2/2     Running   2          4d2h
linkerd-grafana-5dd9c59db5-vgjl2          2/2     Running   2          4d2h
linkerd-identity-5cfccc588d-wppgw         2/2     Running   2          4d2h
linkerd-prometheus-55fc58bb7d-8dppd       2/2     Running   2          4d2h
linkerd-proxy-injector-6f4cb77c6c-2ftmf   2/2     Running   2          4d2h
linkerd-smi-metrics-c8c964676-z4g6l       2/2     Running   2          4d2h
linkerd-sp-validator-5d795d7d88-lw2jc     2/2     Running   2          4d2h
linkerd-tap-7dddbf944f-55sks              2/2     Running   2          4d2h
linkerd-web-7bc875dc7f-jthxd              2/2     Running   2          4d2h
Inject the Linkerd Proxy
The next step is to “mesh” the components by injecting the Linkerd sidecar
proxy into their containers. Linkerd features an
auto-injection feature to
make it simple to add your services to the service mesh. In the next steps,
we’ll annotate the default, ambassador and knative-serving namespaces to
add their components which will instruct the proxy-injector to inject the
Linkerd proxy.
- Annotate the namespaces and restart the Deployments
The Linkerd control plane will automatically inject the Linkerd data plane
proxy into any pods created in namespaces annotated with
linkerd.io/inject: enabled which we can add using the annotate
subcommand.
kubectl annotate ns ambassador knative-serving default linkerd.io/inject=enabled
- Restart the deployments in the respective namespaces
(this requires kubectl 1.15 or greater)
kubectl rollout restart deploy -n ambassador
kubectl rollout restart deploy -n knative-serving
- Redeploy the helloworld-go service
When Knative Service resources are created, there are subsequent Revision,
Configuration, and Route CRDs that are created by the Knative system level
components, which means that using the rollout command won’t work. The
Knative docs briefly describe
this, so the simplest way to make sure that the resource is injected is to
delete and recreate it:
kubectl delete -f helloworld-service.yml
kubectl apply -f helloworld-service.yml
Now let’s verify that the pods are injected with the proxy.
- Wait for the pods to start
kubectl wait po -n ambassador --all --for=condition=Ready
kubectl wait po -n knative-serving --all --for=condition=Ready
- When all the pods are ready, run
kubectl get po -n ambassador
kubectl get po -n knative-serving
to see output like this:
NAME                          READY   STATUS    RESTARTS   AGE
ambassador-665657cc98-jsnsg   2/2     Running   2          123m
ambassador-665657cc98-pk5pt   2/2     Running   2          124m
ambassador-665657cc98-wrkzz   2/2     Running   0          123m
...
NAME                                READY   STATUS    RESTARTS   AGE
activator-6dbc49b5d7-m89nd          2/2     Running   0          4h17m
autoscaler-948c568f-fpxhl           2/2     Running   0          4h17m
controller-5b6568b4ff-fg6ph         2/2     Running   1          4h17m
webhook-7d8b6fb77f-mk9gp            2/2     Running   1          4h17m
In the output from each command, we see that the number of containers in the
READY state is 2/2, which means everything is great and that the system-level
workloads are injected with Linkerd. Let’s verify that using the Linkerd CLI
and dashboard.
Using the Linkerd CLI and Dashboard
Linkerd is designed to show real-time metrics and there are two interfaces for observing those metrics: CLI subcommands and the Linkerd dashboard. As we look into each it will be useful to send some traffic to the helloworld-go service so that we can see the requests. We’ll start a simple while loop to generate traffic:
If the kubectl port-forward command isn’t already running, start it:
kubectl port-forward -n ambassador svc/ambassador 8080:80 &
Now start sending a request every three seconds:
while true; do curl -H "HOST: helloworld-go.default.example.com" http://localhost:8080; sleep 3; done
CLI
The Linkerd CLI has subcommands that you can use to view the rich metrics that Linkerd collects about each of the services that have the Linkerd proxy injected. For example, the stat command will show you the high level details of the resources in your cluster. Try running this command:
linkerd stat deploy --all-namespaces
You should see output like this which shows some nice detail about all of the deployments in your cluster including:
- Whether the deployment is meshed
- Success rates
- Throughput (RPS)
- Request latencies
Example output:
NAMESPACE         NAME                             MESHED   SUCCESS      RPS   LATENCY_P50   LATENCY_P95   LATENCY_P99   TCP_CONN
ambassador        ambassador                          1/1   100.00%   0.7rps           1ms           1ms           1ms          1
default           helloworld-go-7f49j-deployment      1/1   100.00%   1.5rps           1ms           2ms           2ms          4
knative-serving   activator                           1/1   100.00%   0.7rps           4ms           9ms          10ms          3
knative-serving   autoscaler                          1/1   100.00%   0.2rps           1ms           1ms           1ms          3
knative-serving   controller                          1/1         -        -             -             -             -          -
knative-serving   webhook                             1/1         -        -             -             -             -          -
kube-system       cilium-operator                     0/1         -        -             -             -             -          -
kube-system       coredns                             0/2         -        -             -             -             -          -
kube-system       kubelet-rubber-stamp                0/1         -        -             -             -             -          -
linkerd           flagger                             0/1         -        -             -             -             -          -
linkerd           linkerd-controller                  1/1   100.00%   0.3rps           1ms           2ms           2ms          2
linkerd           linkerd-destination                 1/1   100.00%   0.3rps           1ms           3ms           3ms         19
linkerd           linkerd-grafana                     1/1   100.00%   0.3rps           1ms           3ms           3ms          2
linkerd           linkerd-identity                    1/1   100.00%   0.3rps           1ms           5ms           5ms         17
linkerd           linkerd-prometheus                  1/1   100.00%   0.2rps           1ms           1ms           1ms          9
linkerd           linkerd-proxy-injector              1/1   100.00%   0.3rps           1ms           2ms           2ms          2
linkerd           linkerd-smi-metrics                 1/1         -        -             -             -             -          -
linkerd           linkerd-sp-validator                1/1   100.00%   0.3rps           1ms           4ms           4ms          6
linkerd           linkerd-tap                         1/1   100.00%   0.3rps           1ms           2ms           2ms          6
linkerd           linkerd-web                         1/1   100.00%   0.3rps           1ms           5ms           5ms          2
Another example is the tap command,
where you can see real-time requests being sent to resources. This command
streams the requests that are being sent to and from the helloworld-go pod in
the default namespace:
linkerd tap po --namespace default
The output shows traffic to the service endpoint, as well as traffic to the
/metrics endpoint of the linkerd-proxy.
req id=0:0 proxy=in  src=10.244.0.147:47050 dst=10.244.1.16:9090 tls=true :method=GET :authority=helloworld-go-7f49j-private.default:9090 :path=/metrics
rsp id=0:0 proxy=in  src=10.244.0.147:47050 dst=10.244.1.16:9090 tls=true :status=200 latency=1161µs
end id=0:0 proxy=in  src=10.244.0.147:47050 dst=10.244.1.16:9090 tls=true duration=48µs response-length=356B
req id=0:1 proxy=in  src=10.244.0.160:50812 dst=10.244.1.16:8012 tls=not_provided_by_remote :method=GET :authority=10.244.1.16:8012 :path=/
rsp id=0:1 proxy=in  src=10.244.0.160:50812 dst=10.244.1.16:8012 tls=not_provided_by_remote :status=200 latency=2278µs
end id=0:1 proxy=in  src=10.244.0.160:50812 dst=10.244.1.16:8012 tls=not_provided_by_remote duration=39µs response-length=37B
req id=0:2 proxy=in  src=10.244.0.147:47050 dst=10.244.1.16:9090 tls=true :method=GET :authority=helloworld-go-7f49j-private.default:9090 :path=/metrics
rsp id=0:2 proxy=in  src=10.244.0.147:47050 dst=10.244.1.16:9090 tls=true :status=200 latency=4138µs
end id=0:2 proxy=in  src=10.244.0.147:47050 dst=10.244.1.16:9090 tls=true duration=90µs response-length=354B
req id=0:3 proxy=in  src=10.244.0.147:47050 dst=10.244.1.16:9090 tls=true :method=GET :authority=helloworld-go-7f49j-private.default:9090 :path=/metrics
rsp id=0:3 proxy=in  src=10.244.0.147:47050 dst=10.244.1.16:9090 tls=true :status=200 latency=1057µs
end id=0:3 proxy=in  src=10.244.0.147:47050 dst=10.244.1.16:9090 tls=true duration=44µs response-length=372B
req id=0:4 proxy=in  src=10.244.0.160:50812 dst=10.244.1.16:8012 tls=not_provided_by_remote :method=GET :authority=10.244.1.16:8012 :path=/
rsp id=0:4 proxy=in  src=10.244.0.160:50812 dst=10.244.1.16:8012 tls=not_provided_by_remote :status=200 latency=2019µs
end id=0:4 proxy=in  src=10.244.0.160:50812 dst=10.244.1.16:8012 tls=not_provided_by_remote duration=41µs response-length=37B
req id=0:5 proxy=in  src=10.244.0.147:47050 dst=10.244.1.16:9090 tls=true :method=GET :authority=helloworld-go-7f49j-private.default:9090 :path=/metrics
rsp id=0:5 proxy=in  src=10.244.0.147:47050 dst=10.244.1.16:9090 tls=true :status=200 latency=1012µs
end id=0:5 proxy=in  src=10.244.0.147:47050 dst=10.244.1.16:9090 tls=true duration=191µs response-length=356B
req id=0:6 proxy=in  src=10.244.0.147:47050 dst=10.244.1.16:9090 tls=true :method=GET :authority=helloworld-go-7f49j-private.default:9090 :path=/metrics
rsp id=0:6 proxy=in  src=10.244.0.147:47050 dst=10.244.1.16:9090 tls=true :status=200 latency=1035µs
end id=0:6 proxy=in  src=10.244.0.147:47050 dst=10.244.1.16:9090 tls=true duration=201µs response-length=374B
The tap command can provide output for deployments as well as pods. This command will show you all the requests to all the deployments in the default namespace:
linkerd tap deploy --namespace default
And if you want to get more granular output, you can use specific pod names to see traffic between two pods:
linkerd tap po/<pod-name-1> --namespace default --to po/<pod-name-2>
Just replace <pod-name-1> and <pod-name-2> with the names of the pods that you want to tap.
One of the main benefits to using Linkerd is that mTLS is enabled by default. Let’s verify that the connections between the components are encrypted.
linkerd edges deploy -n default
You should see a secure connection between the autoscaler and helloworld-go deployments identified by a green check mark:
SRC          DST                              SRC_NS            DST_NS    SECURED
autoscaler   helloworld-go-7f49j-deployment   knative-serving   default   √
Let’s take a look at one more command before we move on to the dashboard. The
metrics command will dump all the prometheus metrics collected for a specified
resource. For example, this will output all the metrics collected for the
deploy/activator resource in knative-serving:
linkerd metrics --namespace knative-serving deploy/activator
I encourage you to play with both of the top and edges commands to get an idea of how much information they can provide.
Dashboard
The Linkerd dashboard is a component of the Linkerd control plane that provides a nice UI for looking at the workloads that are in the service mesh. To start it, simply run
linkerd dashboard &
Your browser should open with the dashboard and you’ll see that the linkerd,
ambassador, and knative-serving namespaces all have deployments that are
included in the service mesh:

Clicking on any of the namespace will display the pods and deployments in the namespace, with the metrics for each of them.
You can also click the Grafana logo on the right side to see the Grafana dashboards associated with the metrics. Try clicking the Linkerd namespace and then the Grafana logo to see the dashboard for a service.
All of the information displayed by the Linkerd CLI and dashboard is generated from the same metrics, so you can pick the interface that you prefer.
With a configuration like this, you can create as many Knative Services as you want and they will be automatically injected with the Linkerd proxy providing the observability and security features we’ve explored above, making it easier for you to understand the overall health and performance of the system that is running your applications, as well as the applications themselves.
Summary
In this walkthrough, we showed you how to add Linkerd to your Knative deployment to transparently add mutual TLS, metrics, and more. One of Linkerd’s goals is to fit into the ecosystem and play well with other projects, and we think this is a great example of augmenting both Knative and Kubernetes with functionality that the service mesh can provide. We’d love your feedback!
Linkerd is for everyone
Linkerd is a community project and is hosted by the Cloud Native Computing Foundation. Linkerd is committed to open governance. If you have feature requests, questions, or comments, we’d love to have you join our rapidly-growing community! Linkerd is hosted on GitHub, and we have a thriving community on Slack, Twitter, and the mailing lists. Come and join the fun!


