
A guide to distributed tracing with Linkerd

We’re happy to announce that Linkerd 2.6 adds support for distributed tracing! This means that Linkerd data plane proxies can now emit trace spans, allowing you to see the exact amount of time that requests spend in the Linkerd proxy for traced requests. Since using distributed tracing in practice can be quite difficult, in this post, we’ve assembled a reference architecture with our recommendation on the best way to make use of distributed tracing with Linkerd.
Overview
Tracing can be an invaluable tool in debugging distributed systems performance, especially for identifying bottlenecks and understanding the latency cost of each component in your system. If you’re not already familiar with the idea behind distributed tracing, the OpenTelemetry Observability Primer gives a good overview of the concepts. The promises of distributed tracing are exciting, but in our experience, there are significant barriers to achieving those promises in practice.
First, the distributed tracing ecosystem is very complex. It includes a dizzying array of projects such as Zipkin, Jaeger, OpenTracing, OpenCensus, OpenTelemetry, and many many others, each with partially overlapping sets of functionality. There are complex matrices of which projects can interoperate with which other projects and in which ways.
To make matters worse, the addition of a service mesh adds another layer of decision-making complexity. Using a service mesh and using distributed tracing have feature overlap in what they provide, e.g. in the ability to draw application topologies. Also, while most of the features of a service mesh require no code changes, this is not true for distributed tracing. My fellow Linkerd maintainer William Morgan wrote an earlier blog post about this, entitled Distributed tracing in the service mesh: four myths.
Given the amount of confusion we saw in the Linkerd community, it was important to us to not just “add distributed tracing” to Linkerd 2.6 and call it a day, but also to provide concrete recommendations for how a Linkerd-enabled application could actually make use of this feature. Hence, the reference architecture below.
Distributed tracing in Linkerd 2.6
First, let’s understand what exactly “distributed tracing support” looks like in Linkerd. It’s actually quite simple: when a Linkerd data plane proxy sees a tracing header in b3 format in a proxied HTTP request (see below for why this particular format), Linkerd will emit a trace span for that request. This span will include information about the exact amount of time spent in the Linkerd proxy, and, in the future, potentially other information as well.
And that’s it. As you can see, Linkerd’s role in distributed tracing is actually quite simple. The complexity lies in everything else that must be in place in order to make this feature of Linkerd useful.
What else is required? To use Linkerd’s new distributed tracing feature, you’ll need several additional components in your system:
- An ingress layer that kicks off the trace on particular requests.
- A client library for your application. (Your application code must propagate trace headers, and ideally emit its own spans as well.)
- A trace collector to collect span data and turn them into traces.
- A trace backend to store the trace data and allow the user to view/query it.
Demo!
Let’s take a look at how distributed tracing works in our reference architecture. Then we’ll describe each of the components in more detail and explain how to use those components in your own application.
Make sure you have the Linkerd 2.6 CLI available and have Linkerd 2.6 installed on your cluster. If you don’t, you can follow the installation or upgrade instructions.
$ linkerd version
Client version: stable-2.6
Server version: stable-2.6
Start by cloning the reference architecture repository:
git clone [email protected]:adleong/emojivoto.git && \
    cd emojivoto
Next we install Jaeger and the OpenCensus collector. It’s important to inject these components with Linkerd so that they can receive spans from the Linkerd proxy over a secure connection.
linkerd inject tracing.yml | kubectl apply -f -
Finally, we install the Nginx ingress controller and the Emojivoto application itself. Since we inject these components with Linkerd, we will be able to see the Linkerd proxy itself in the resulting traces.
linkerd inject emojivoto.yml | kubectl apply -f - && \
    linkerd inject ingress.yml | kubectl apply -f -
With all of that in place, we can use the Jaeger dashboard to explore traces flowing through the system.
kubectl -n tracing port-forward deploy/jaeger 16686 &; \
    open http://localhost:16686
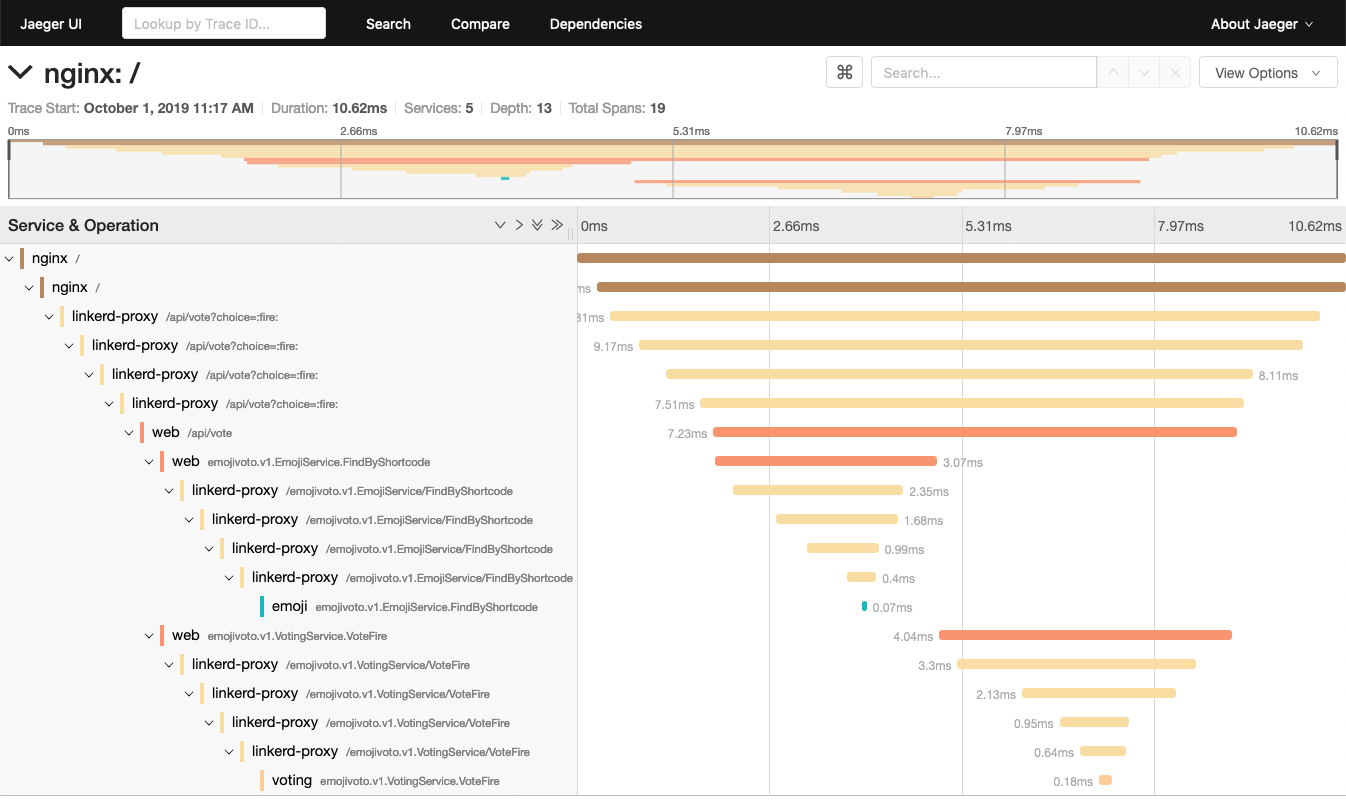
Linkerd Distributed Tracing Reference Architecture
This reference architecture definitely isn’t the only way to get distributed tracing for your application, and it may not even be the best way, depending on your application and its requirements, but it’s a good starting point and will work well with or without a service mesh.
The reference architecture has 4 components: Nginx for ingress, OpenCensus for the client library, OpenCensus for the trace collector, and Jaeger for the backend. We’ll describe each of these components in more detail. Of course, each of these components is swappable–we’ve detailed the requirements for substituting a different option for each component below.
Ingress: Nginx
The ingress is an especially important component for distributed tracing because it creates the root span of each trace and is responsible for deciding if that trace should be sampled or not. Having the ingress make all sampling decisions ensures that either an entire trace is sampled or none of it is, and avoids creating “partial traces”.
Distributed tracing systems all rely on services to propagate metadata about the current trace from requests that they receive to requests that they send. This metadata, called the trace context, is usually encoded in one or more request headers. There are many different trace context header formats and while we hope that the ecosystem will eventually converge on open standards like W3C tracecontext, we only use the b3 format today. Being one of the earliest widely used formats, it has the widest support, especially among ingresses like Nginx.
This reference architecture includes a simple Nginx config that samples 50% of traces and emits trace data to the collector (using the Zipkin protocol). Any ingress controller can be used here in place of Nginx as long as it:
- Supports probabilistic sampling
- Encodes trace context in the b3 format
- Emits spans in a protocol supported by the OpenCensus collector
Client library: OpenCensus
While it is possible for services to manually propagate trace propagation headers, it’s usually much easier to use a library which does three things:
- Propagates the trace context from incoming request headers to outgoing request headers
- Modifies the trace context (i.e. starts a new span)
- Transmits this data to a trace collector
We recommend using OpenCensus in your service and configuring it with:
- b3 propagation (this is the default)
- the OpenCensus agent exporter
The OpenCensus agent exporter will export trace data to the OpenCensus collector over a gRPC API. The details of how to configure OpenCensus will vary language by language, but there are guides for many popular languages. You can also see an end-to-end example of this in Go with our example application, Emojivoto.
You may notice that the OpenCensus project is in maintenance mode and will become part of OpenTelemetry. Unfortunately, OpenTelemetry is not yet production ready and so OpenCensus remains our recommendation for the moment.
Collector: OpenCensus
The OpenCensus collector receives trace data from the OpenCensus agent exporter and potentially does translation and filtering before sending that data to Jaeger. Having the OpenCensus exporter send to the OpenCensus collector gives us a lot of flexibility: we can switch to any backend that OpenCensus supports without needing to interrupt the application.
Backend: Jaeger
Jaeger is one of the most widely used tracing backends and for good reason: it is easy to use and does a great job of visualizing traces. However, any backend supported by OpenCensus can be used instead.
Linkerd
If your application is injected with Linkerd, the Linkerd proxy will participate in the traces and will also emit trace data to the OpenCensus collector. This enriches the trace data and allows you to see exactly how much time requests are spending in the proxy and on the wire. To enable Linkerd’s participation:
- Set the
config.linkerd.io/trace-collectorannotation on the namespace or pod specs that you want to participate in traces. This should be set to the address of the OpenCensus collector service. In our reference architecture this isoc-collector.tracing:55678. - Set the
config.alpha.linkerd.io/trace-collector-service-accountannotation on the namespace or pod specs that you want to participate in traces. This should be set to the name of the service account of the collector and is used to ensure secure communication between the proxy and the collector. This can be omitted if the collector is running as the default service account. This is the case for the reference architecture so we omit it. - Ensure the pods that you want to emit spans are injected with the Linkerd proxy.
- Ensure the OpenCensus collector is injected with the Linkerd proxy.
While Linkerd can only actively participate in traces that use the b3 propagation format (as in the reference architecture above), Linkerd will always forward unknown request headers transparently, which means it will never interfere with traces that use other propagation formats. We would also love to expand Linkerd’s support for more propagation formats. Please open an issue (or pull request!) if this interests you.
Conclusion
Hopefully this reference architecture makes it easier for you to understand the different moving parts of distributed tracing and to get started instrumenting your application. While the reference architecture above isn’t the only way to get distributed tracing for your application, we’d hope it represents a good starting point for your exploration. And if it doesn’t, please let us know!